Saturday, June 11, 2011

Transform the Yard! - A Patio, Wall, Walkway Story

OK, so some projects you just need to hire the pros to get done.  We have been wanting to do this for several years but we knew it would be expensive so saved, saved and saved to transform the backyard.  We love having people over and with two small kids and their friends it was becoming a real pain to deal with sitting on the deck and watching small kids play in the yard.  There was nowhere to sit and relax and talk while still being close to the kids and it really looked like crap.  So we hired a local company who had done some work for us in the past.  Company is called Grass Roots Inc. of New Fairfield, CT.  Great group of guys, very professional and know what they are doing.  They do a lot of work in the area and I can't say enough about the job they did here.  If any of you read this, THANK YOU!

The choice for pavers was Unilock.  My wife spent a lot of time looking through the books and website trying to put together a nice color match.  We also needed a retaining wall at the edge of the house where the ground was about 3-4 feet higher than the door area. 

The style block we chose is Stonehendge and the color is Sierra.  We also had an insert band put in of Copthorne and the color was a mix of Burnt Clay and Burgundy Red.  Then the soldier course around the outer ring is Brussels Block and the color is Sierra.  The wall is a Brussels Dimensional System Wall, color is Sierra and a band of Copthorne, mixed colors, cut in half and inserted upright. 

Before and After Photos and the story and detail below that.


Here is what the back area looked like before.  Dirt/grass/weeds, basically crap.  Now that we had a finished basement and a usable door it made even more sense to put in a patio.

Under the deck before picture.  Dirt, weeds, exposed concrete for the deck posts.

We also had a walkway from the driveway to the deck that was some broken blue stone.  Not nice at all.


The delivery!!!!  That's a lot of stone.


Let the digging begin!!!

And once the digging began they almost immediately hit a pipe.  CRAP!  It was coming off the gutter and running out through the lawn and into the woods.  It needed to be rerouted around the outside of where the wall would be and reattached at a point that was out of the way of the patio.  Wasn't a problem for the crew though. 

Finally the digging is done, the new pipe is in and the ground is flat!

Lots and lots and lots of processed stone at the base for the patio.  Compacting along the way.  A concrete pad added where the pillar at the end of the wall will go.


And the wall starts to form!


The wall and pillar are taking shape.
Adding large gravel behind the wall for drainage and conduit pipe on the pillar for future light on top of the pillar cap.  We chose to use the wall bocks for the top of the wall and the cap for the pillar instead of using the standard coping.  Liked the look much more.

The sand and the patio start to go in.  Brussels Block Sierra soldier course on the right, Copthorne Burnt Clay and Burgundy Red as the insert band and then Stonehenge Sierra as the field in the center.  Stone is wet so the color is darker that normal.


Almost complete!!!!  Great job by Grass Roots crew building it out and then cutting the curve while the blocks were in place!
Wall and pillar looking good

PATIO IS DONE!!!
The curve!  Nicely done.


All Copthorne blocks cut in half and put into place in the wall and pillar..
We wanted a Belgium Block border under the deck.  That is started below!

After the first rainfall...

Under Deck Filled with Gravel and Belgium Block done.


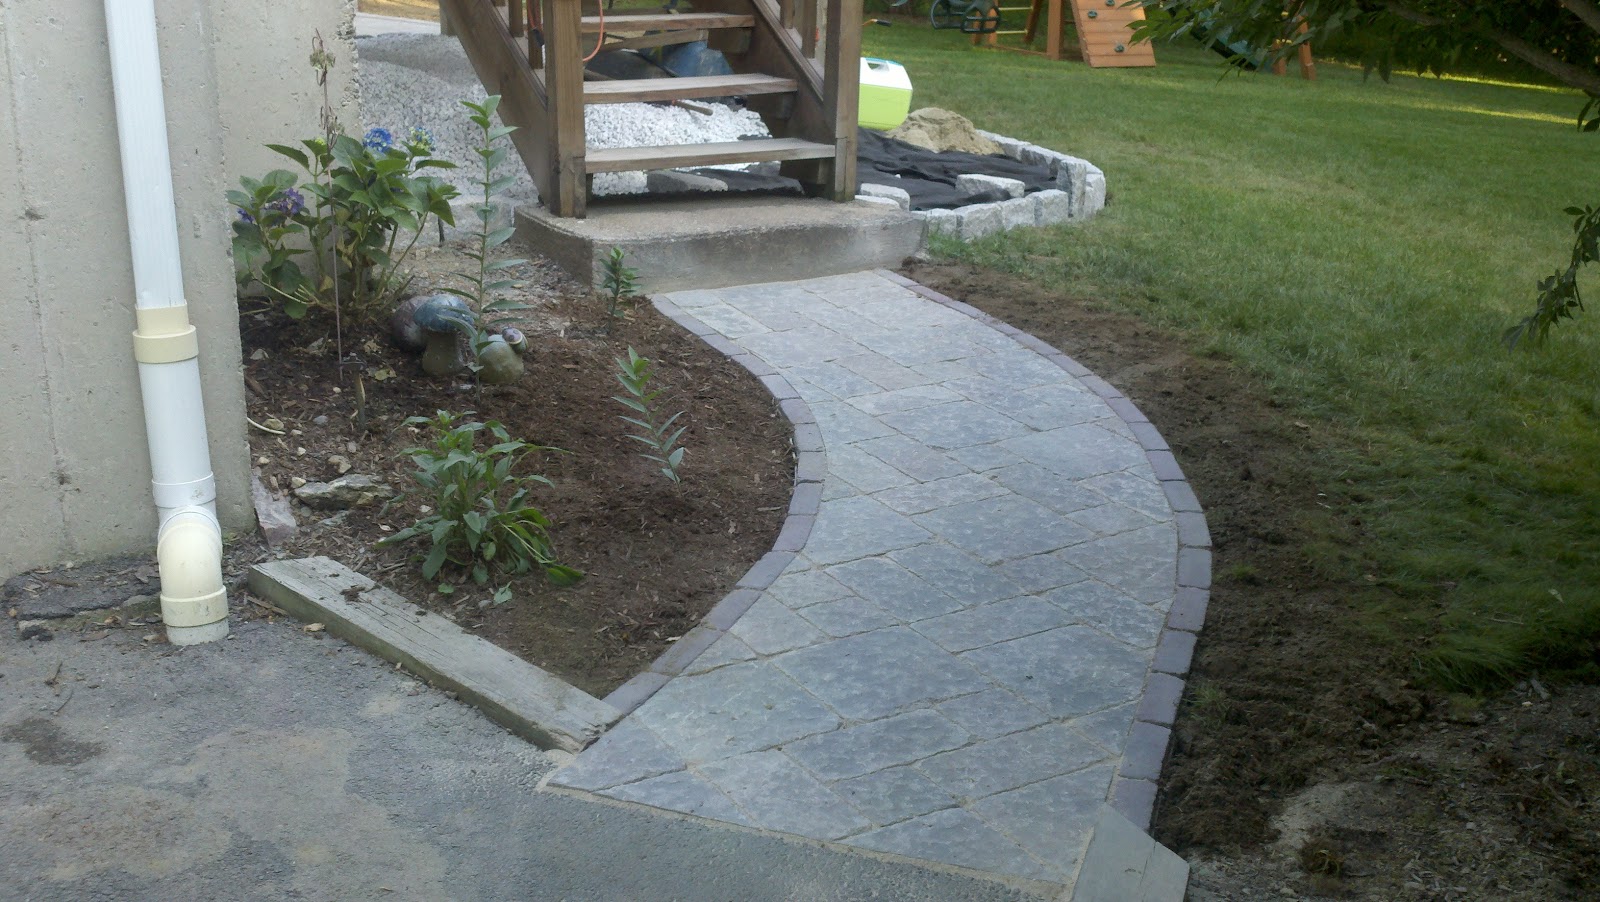
Walkway transformed!


Overall, a great project and a job well done by Grass Roots.  Really can't say enough about them.  Sometimes you just need to hire the pros!

Here are the pavers once again:

Unilock Stonehenge Sierra
Unilock Copthorne Burnt Clay and Burgundy Red
Unilock Brussels Block Sierra
Unilock Brussels Dimensional System Sierra


Friday, June 10, 2011

Old. Ugly. Time For a Refresh - A Landscape Story

Landscaping?  Not a problem...

Growing up I did enough landscaping projects with my father that I knew this one wouldn't be a problem.  I also worked on the town Youth Corp for a few summers doing different landscaping projects around town and at the local ball fields and was the maintenance man for two summers at the local pool where my job mainly consisted of lawncare, shrub care, mulching every year, cleaning the grounds, etc...

This project was something I was really looking forward to when I moved in.  The front walkway was a mess.  There was a row of shrubs that looked like a bunch of sticks and nothing else.  In the summer they would get some green leaves but it was not what I was looking for.  So I started looking around and playing with some different landscaping programs online (Yes, my favorite resource....the internet).  Here is a picture of what it looked like along the walkway.


So, I started by removing what was there, edging and amending the soild with compost.  I used a Coast of Maine Compost project which was excellent.  Has blueberrys, crushed mussel shells and peat mixed in.  Very solid product.

Removed schrubs.......ahhhhhhhh, a clean slate.


Some edging???  OF COURSE!


I decided on some Green Gem Boxwoods.  Really nice looking small shrubs that stay green all year.  Here is my "artist rendition" of what it would look like.  After she saw this I got the go ahead form the wife and bought the shrubs.


Bought the shrubs, along with some Purple Dwarf Rhododendrums.  I used a tape measure for proper spacing of the shrubs.


Then planted them!  Looks just like the artist rendition.


Added the Purple shrubs and some mulch and HERE WE GO!!!


Also added a few other shrubs on the other side of the walkway.


As an added bonus I decided to edge and mulch on the fire bush we had in the back yard.  Hard to mow under it and the grass wasn't growing well.  Here are a few photos of that process which included edging, weed cloth and mulch.  Fun fun!


And Then There Were Lights - A Light Fixture Story

"I'm an ELECTRICIAN!"

Not really but I found out I can change light fixtures and it is pretty darn easy.  If you saw this post (A Paint Story) then you saw the old and outdated light fixtures throughout this house.  So far I have changed 8 light fixtures all on my own.  It is actually quite easy and there is a lit of info on how to do it, where else?!?!?, on the internet!  Also, the instructions that come with most light fixtures are very well written and easy to follow.

HOME TIP: Always read the directions and do your research before starting any home project or product installation.

One of the keys to the whole thing is this, and another Home Tip.........

HOME TIP: ALWAYS turn off the main breaker when doing anything dealing with electric.  Change light fixtures and or switches during the DAY and use a flashlight if needed.  Turning off that zone is risky because you may turn of the wrong breaker and get fried.....

I have also changed many light switches and some outlets.  Again another easy job but with some more intricacies since you need to know the type of switch to purchase according to how many switches can control that light or outlet.  Also, when several lights or outlets are in the same spot you need to check how they are connected together, document that BEFORE you remove the switches and/or outlets and then reconnect all in the same way they were originally connected.  This is VERY important and if you don't understand how the connection works then do some research on the internet or call a pro.

Hope this helps.  Thanks for reading!!

Thursday, May 19, 2011

Don't We All Love Foundations? DIY - A Basement Story

"I can finish the basement by myself"

Seriously, I can. I know it! That was the thought anyway. Why not give it a shot? So, we had a walkout basement with laundry area, boiler, fridge, steps going up the center and a door to the two car garage. One wall is full foundation, one wall is sheetrock (between the basement and the garage and then a half foundation/half sheetock with three windows for two other walls. The floor is also concrete/foundation. A lot of my relatives are in the consturction business as carpenters or builders and one cousin had offered to assist with the framing of the basement since he wasn't building a house at the time. I took him up on that offer and we decided to finish the basement.

We divided the basement into two sections, one will be finished (a little more than half) and one to stay unfinished and provide storage, laundry and boiler. In one day, with the right equipment, we were able to frame the room, including a small utility room where the central vacuum is located and electrical panel, and build the sub-floor. Once the frame was up we hired an electrician to run the elctrical, I did the insulation, the sheetrock, hired someone to do the taping (wanted smooth walls), I installed the prehung doors, all the trim work around windows and doors, installed a wooden shelf and painted everything (never fun cutting in around those edges). Lastly we hired someone to install the carpet. Here is the step-by-step process we used for this project and explanation of each step.

My Cousin was inside measuring and installting the floor and frame, my father was outside cutting the lumber to size and I was in between working with both on different aspects of the job. 

We started by putting sleepers on the floor for the sub-floor.  These will be used to nail the plywood for the sub-floor into place.


In between each sleeper is a cut to size piece of foam insulation.  Cutting all these was not fun. 


Sub-Floor COMPLETE!

After the floor was done we could put up the frame and it went up easy with the right tools.  Nail guns are KEY to this type of project.  Photo is the same as photo 1.  Looking from laundry room into what will be the finished room.


Framing complete!

Next step was electrical and then insulation.  We decided to use a fire/sound insulation for the room where the laundry and boiler would be running.  I can say this was probably one of the best moves since you can hardly hear them when they are running and the door to that room is closed.

I used foam insulation and spray foam to fill any gaps for all foundation walls.  Tooks some time but it was recommended and the town Building Inspector seemed to really like it!

Used a regular insulation for the ceilings.

And the sheetrock starts.  As you can see, the first two sheets did not work out very well.  I took them down shortly after this picture and used them as smaller pieces elsewhere.

Well done sheetrock on this side!


Aaaaaaaand, the finished product after all the trim and painting and installation of a new door and hiring someone to install the carpet.  This room is now a playroom for my kids and a really GREAT addition to the house!


THANKS FOR READING!!!!