Thursday, May 19, 2011

Don't We All Love Foundations? DIY - A Basement Story

"I can finish the basement by myself"

Seriously, I can. I know it! That was the thought anyway. Why not give it a shot? So, we had a walkout basement with laundry area, boiler, fridge, steps going up the center and a door to the two car garage. One wall is full foundation, one wall is sheetrock (between the basement and the garage and then a half foundation/half sheetock with three windows for two other walls. The floor is also concrete/foundation. A lot of my relatives are in the consturction business as carpenters or builders and one cousin had offered to assist with the framing of the basement since he wasn't building a house at the time. I took him up on that offer and we decided to finish the basement.

We divided the basement into two sections, one will be finished (a little more than half) and one to stay unfinished and provide storage, laundry and boiler. In one day, with the right equipment, we were able to frame the room, including a small utility room where the central vacuum is located and electrical panel, and build the sub-floor. Once the frame was up we hired an electrician to run the elctrical, I did the insulation, the sheetrock, hired someone to do the taping (wanted smooth walls), I installed the prehung doors, all the trim work around windows and doors, installed a wooden shelf and painted everything (never fun cutting in around those edges). Lastly we hired someone to install the carpet. Here is the step-by-step process we used for this project and explanation of each step.

My Cousin was inside measuring and installting the floor and frame, my father was outside cutting the lumber to size and I was in between working with both on different aspects of the job. 

We started by putting sleepers on the floor for the sub-floor.  These will be used to nail the plywood for the sub-floor into place.


In between each sleeper is a cut to size piece of foam insulation.  Cutting all these was not fun. 


Sub-Floor COMPLETE!

After the floor was done we could put up the frame and it went up easy with the right tools.  Nail guns are KEY to this type of project.  Photo is the same as photo 1.  Looking from laundry room into what will be the finished room.


Framing complete!

Next step was electrical and then insulation.  We decided to use a fire/sound insulation for the room where the laundry and boiler would be running.  I can say this was probably one of the best moves since you can hardly hear them when they are running and the door to that room is closed.

I used foam insulation and spray foam to fill any gaps for all foundation walls.  Tooks some time but it was recommended and the town Building Inspector seemed to really like it!

Used a regular insulation for the ceilings.

And the sheetrock starts.  As you can see, the first two sheets did not work out very well.  I took them down shortly after this picture and used them as smaller pieces elsewhere.

Well done sheetrock on this side!


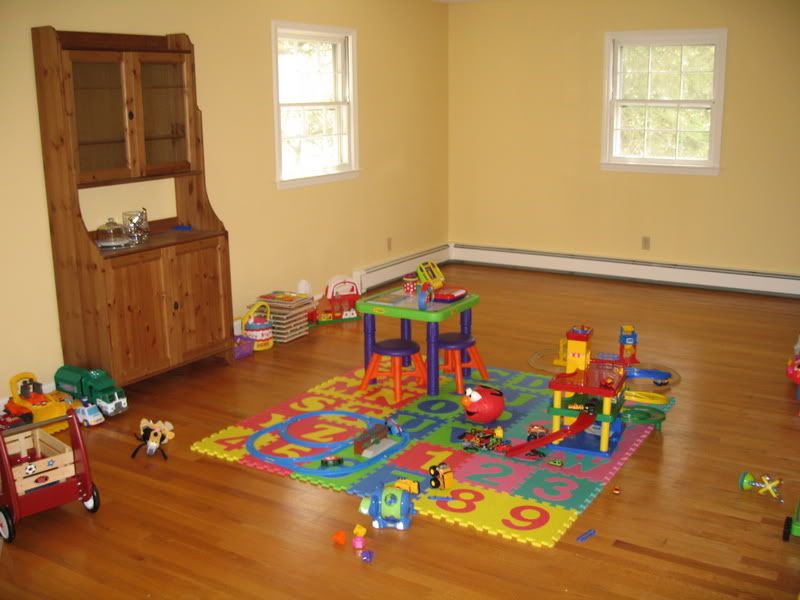
Aaaaaaaand, the finished product after all the trim and painting and installation of a new door and hiring someone to install the carpet.  This room is now a playroom for my kids and a really GREAT addition to the house!


THANKS FOR READING!!!!

Saturday, May 14, 2011

Little Wax Ring - A Toilet Story

"There's water around the toilet."

OK, so this one should be short and sweet. I began to notice water around the bottom of the toilet and discovered, after some research, that it was very likely the wax ring under the toilet was no longer working and needed to be changed. I watched some online videos (WHAT A RESOURCE!) on how to change the ring and printed out directions from one great site. Once I removed the toilet, I noticed the shutoff valve was very rusty and also starting to leak so I figured while I was doing this I might as well change that as well.  It's funny how things get uncovered with almost every job I take on.  Back to the internet to watch some videos on how to change the shutoff valve. I went to Home Depot and got the new shutoff valve only to find out when I get home it is the wrong size, go back again and this time wrong connection type.  AAARGH!! Turns out third time was right on.

HOME TIP: Measure parts that are needed for a project BEFORE going to the store to make your purchase or you will be driving back and forth to the store until you get the right one.

After successfully changing the valve and installing the new ring, it was time to put the toilet back on and seal around the bottom with caulk. Done! Easy after a few stumbles.

HOME TIP: You can do plumbing projects. They are not THAT hard if you follow the directions closely, which can be found on the internet for most projects. Obviously if you have to change the route of plumbing pipes in the house for a certain project you should call a professional.

Thanks for reading!

Friday, May 13, 2011

From Wrecked to Right - A Lawn Story

"You guys totally destroyed the lawn!!!"

The lawn. Show me a man who doesn't love his lawn and I'll show you someone who doesn't care much about anything....OK, that's a stretch but so many people take pride in their lawn and work hard to ensure it looks great every summer. I can respect people who work long hours or travel a lot who don't have time to take care of it but I also deeply respect people who are willing to put in the work to make their house and in turn the neighborhood look good with a well manicured lawn.

It all started with the oil tank removal and the destruction of the lawn during the excavation of the tank. The lawn was completely destroyed. The seller had to pay for a landscaping company to come and put down top soil and seed almost the entire back yard. The first year there were lots of weeds and some nice grass but I also did not understand how to truly 'care' for a lawn. I knew I had to cut it often but didn't know all the ins and outs. So, I turned to my trusty friend the internet for some research on lawn care. It is amazing the amount of information available on this subject. Probably the best place I found is the Cornell Cooperative Extension.

HOME TIP: Find your local Cooperative Extension and read about lawn and garden care in your area. These are GREAT resources for homeowners because of the localized recommendations.

I learned a lot from that website like not fertilizing too early in the spring or not cutting at the lowest setting on your mower or not cutting more than a 1/3 of the grass plant at a time, meaning you may have to mow more often, or crowding out weeds in the summer by cutting higher. Those are just some of the tips I've learned from that site.

I have used many different products on the lawn since it was initially started. Some of the best stuff I've used is the LazyMan Liquid Gold and LazyMan Soil Doctor

Here is what it looked like when it was first reseeded.


That first year I was cutting way to short and lots of weeds invaded the lawn.


After some weed killing, reseeding, Correct cutting height, LazyMan applications and correct watering, the next year the lawn looked like this.


This year the lawn is also coming in well. We've had some problems down by the trees due to the heavy amount of shade but reseeding and topsoil is making it fill in more and more each year. It's been really fun watching is look great and sometimes not so great. I will try to get some updated pictures from this springs beauty! Thanks for reading!!

Wednesday, May 11, 2011

What Tools Do I Need?? - An Equipment Story


"I need to get myself a..." - Famous words said by me to my wife over the past 4 years.

Thankfully I have two working hands and feet and did some landscape work as a kid at my house as well as two years at the local town pool. I learned a lot those years about mowings, trimming, edging, planting, leaf removal and many other aspects of landscaping. I thought, "How hard could it be to take care of the front and back lawns, planting beds, bushes, etc. as well as snow removal for the driveway? I'm not paying soemone to do this stuff!!"

First thing I needed was the tools for the job. So, I turned to the vast internet for information, reviews and comparisons. The internet is an amazing resource for that type of information. First thing I did was make a list of what I needed and when I needed it. Since it was springtime when we moved in, I knew I was going to need a lawnmower and a Weed Trimmer/Whacker. Then in the fall I would need a leaf blower. This allowed me to spread the cost of the different equipment over a longer period fo time instead of buying everythign at once.

HOME TIP: Buy your equipment on an as needed basis in order to spread the cost of purchasing sometimes expensive items.

I've put together a set of pictures below of the equipment I've purchased over the years and how I came about to purchasing them.

Click on the photos for larger versions of the picture.

First things I purchased was the mower and trimmer in 2007. I shopped around the internet, read reviews and thought about the brands I used in the past and found that the Craftsman line from Sears was very well reviewed so I went to see what kind of deal I could find. That day I purchased the mower below and a trimmer that has universal attachments that you can purchase. The box came with the weed trimmer and the edging tool (awesome tool!) I love the universal trimmer. I would HIGHLY recommend it for anyone doing their own work at home. Trimmer, Edger, Pole Saw and Hedge Trimmer. I recently purchased the pole saw as well and it works great!!! (The Pole Saw will be part of a later post as well).


Then fall of 2007 came around the leaves started falling. I am surrounded by huge trees and a forest behind my house. The amount of leaves I get is sickening to look at because I know the time it will take to removed it. I did the research and read the reviews and purchased the handheld, gas Troy Bilt blower below. I used that to clean the entire property and it took HOURS and HOURS of work to get done. Just not powerful enough and heavy to carry around. I didn't want to spend the money on the backpack blower at the time.......but I should have. Terrible move!!!


HOME TIP: Know when to spend the extra money. Think things through and think about the possible consequences of going the cheaper route. Many companies have 0% financing so don't be shy about spending a little more if you are in position to that can be paid off over time. You don't always need THE BEST but the cheapest doesn't always workout.


After 3 years of using the handheld blower and taking WAY too long to get done with the leaves, I decided it was time to buy a backpack blower and sell this one on Craig's List. Well, I did the research and found that there were walking blowers that cost just as much as the backpack versions and I already had the other one for the smaller areas. DONE. 0% financing for 12 months. This thing blows the doors off of having a handheld or a backpack. It's powerfull and easy to push. It is a Troy-Bilt as well. SECOND BEST PURCHASE SINCE THE MOVE!


BY FAR THE NUMBER ONE PIECE OF EQUIPMENT I HAVE PURCHASED IS BELOW. After 2 years of shoveling, hiring a plow man and just overall frustration about the snow removal, I finally caved in and purchased a snowblower in the Winter of 2009-10. My driveway is long, a hill and with an extra two car parking area away from the two car garage. NOT easy to shovel. Took at least two hours. I hired a plow man who would come several times a storm and charge me for each visit or wouldn't come enough and I would have to shovel. Disaster. What a difference this machine makes! I do my whole driveway in under 45 minutes depending on the amount of snow. Any homeowner with a sizable driveway needs one of these.


That is mostly all the things I've purchased for outside use. I've purchased some power tools but maybe that will be another post at some point! Thanks for reading!

Monday, May 9, 2011

Oil, Soil and Turmoil - An Environmental Story

"Unfortunately, the oil tank was leaking."

As part of the sale of a house in the state of CT there is a mandate to remove any in-ground tanks and have them installed in the garage/basement (garage in our case). This is all to be paid by the seller prior to closing. If the tank is found to be leaking then it needs to be reported to the state and a specialty company hired to continue the excavation and removal of any contaminated soil. The caused a HUGE problem for the purchase of the house. So many risks for the homeowner involved with oil released into the soil around a residential home. For example, well water contamination, nearby stream water contamination and the dreaded neighbor's well water contamination that could end in a lawsuit.

HOME TIP: If you are dealing with an in-ground oil tank during the sale or purchase of a home make sure to DO YOUR RESEARCH on what needs to be done in your state to remove and dispose of the tank and/or contaminated soil.

I did the research and found that a Licensed Environmental Professional (LEP) should be present during the removal of contaminated soil as well as the digging of test pits around the property to see if the oil had spread far on the property. At the end of this, I received a 30+ page document with the field tests, description of the remediation steps and statements from the LEP stating the remediation was a success. This can be used to protect me against any future issues as well as the sale of the home if we ever sell in the future.

The remediation included the removal and incineration of 94 tons of soil, a huge pit dug into the ground, a totally destroyed lawn (foreshadowing for upcoming blog entry), a broken septic pipe and damage to the deck and the railroad ties around the driveway from the large equipment running over them. This all needed to be fixed in an acceptable manner prior to closing. New top soil and seed, new railroad ties, new deck joist, etc and all at the expense of the seller.

HOME TIP: If you have an old oil tank in the ground at your current home. GET IT OUT OF THERE NOW BEFORE IT LEAKS AND COSTS YOU TENS OF THOUSANDS OF DOLLARS!!!!

Everything was fixed except for the septic pipe and I was not going to let that go. I spoke to the seller and told him I would not buy the house unless that was dug up and fixed as well. He stated that he was told that is was a septic overflow pipe and useless. I insisted that it be fixed and after some conversation it was fixed. I then got the septic tank checked and was told that the pipe that was cut was the main pipe that ran to the leach field. Meaning, if it was not fixed the tank would have filled with nowhere for the waste to go but back into the house.

HOME TIP: If they break something while fixing something else, MAKE SURE THEY FIX WHAT THEY BROKE!!! It may just keep human waste from backing up into your house.

Once all was fixed and the property was given a clean bill of health we were ready to move on.

Here are the pictures of the remediation.


Layer After Layer After Layer - A Paint Story

"Let's paint the interior before we move in!"

That's what we agreed to do prior to moving into the house. Who knew it would take so long or take so many coats of paint to complete but it did. The first thing that needed to get done was to pick out the colors. Do we go with Benjamin Moore? Pittsburgh Paint? Behr? Once we selected the company then we got the paint wheel with all the samples and the process began to pick colors for 10+ rooms and hallways. I left this process to my wife and I think she did a fantastic job and selected awesome colors from several different companies, although it took a lot of time and effort on her part and at times drove her absolutely CRAZY!

HOME TIP: One of the best tools for this job was the paint manufacturers website. There you can select different colors for the walls and trim and see what it would look like in a room. Very cool feature to help pick your colors.

Benjamin Moore Website
Pittsburgh Paint Website
Behr Website

Once the colors were selected, we hired a friend of my brother and his crew to do the job and with all our furniture and boxes moved into the house we moved into my parents house for "a couple weeks" while they painted. A couple weeks turned into 4 weeks as more and more layers needed to be painted on ALL the stained wood in the house. We made the decision to have all the stained wood painted white and that included the kitchen cabinets. This took a LONG time for every windows (20) with trim on all of them, every door, every peice of baseboard and crown molding and two bay windows and wall openings and......you get the picture. It was a TON of work. I was there everyday throughout and they were doing a great job but it just took a long time. Two coats of primer and two coats of paint to cover.

Here are some before and after photos with paint names to match:

The den has high ceilings, beams and a beautiful fieldstone fireplace but the wood paneling wasn't what we were looking for. We had the paneling painted with Benjamin Moore Tapestry Beige. The lines from the paneling adds some nice depth to the walls.

Before: (You can see the stained wood windows)


AFTER:


The dining room has a nice bay window and some wood panels on the bottom half of the wall. All painted white. All molding and windows are painted with Benjamin Moore Dove White. Walls are painted with Benjamin Moore Garrison Red.

BEFORE:


AFTER:


There was a big transformation in the kitchen and that was due to the painting of the cabinets, new hardware, new fridge and the removal of the cabinets and 'desk' on the left wall in the before picture. Cabinet color is Benjamin Moore Monterey White and walls are Benjamin Moore Rustic Taupe.

BEFORE: I have also since updated both light fixtures.


AFTER:


Here are some other after pictures. No before but here are the colors for each. Benjamin Moore Dove White for all trim (over stained wood) - Hallway Color - Benjamin Moore Tapestry Beige.


Wall Color - Pittsburgh Paint Dusty Yellow


Wall Color - Benjamin Moore Dill Pickle


Wall Color - Benjamin Moore Harlequin Blue


All Paints are Benjamin Moore, except where noted:

Borders/Molding - White Dove
Hallways/Foyer/Stairwell - Tapestry Beige
Livingroom - PITTSBURGH PAINTS - Dusty Yellow
Dining Room - Garrison Red
Den w/fireplace - Tapestry Beige
Kitchen Walls - Rustic Taupe
Kitchen Cabinets - Monterey White
Master Bedroom - Harbour Town
Bedroom - Harlequin Blue
Guest Bedroom - Stone Hearth
Office - Alabaster
BOTH Upstairs Bathrooms - Alabaster

The Start of Something.....New? Fun? Disaster?

Welcome to "A Changing Home"!!

In the Spring of 2007 my wife and I embarked on what I knew would be a great journey. We bought a home! I bet you thought I was going to say marraige? Well, we had already started that journey in 2001 and what a wonderful journey it has been thus far. Anyway.... We purchased our first home. A 4 bedroom Colonial, white with a brick front and black shutters. the home was built in 1972 and almost everything was original including the baby blue, light brown and light green toilets and sinks in the bathrooms. The previous owner did a great job of keeping the house in great shape so although some of the luster of an all light brown bathroom may have worn off since the 70's the house was clean and in good working order.

We have done a lot of work in the past few years and I was thinking about the best way to keep track of what we have accomplished and will attempt to accomplish in the coming years. Well, this is the route I chose. Not only will this help me track the process but also hopefully help others to get ideas or ask questions or just see that homeownership is hard but you can do it!!

All projects have and will have before an after photos as well as information on the type of products that were used.

Some of the highlights and a preview of the next several home improvement posts:

  • Layer After Layer After Layers - A Painting Story
  • From Wrecked to Right - A Lawn Story
  • Don't We All Love Foundations? DIY - A Basement Story
  • Wow! Those Plants Are Old! - A Landscaping Story
  • The Wax Ring - A Toilet Story

And Coming Soon:

  • Something to Walk and Sit On - A Patio Story
  • Where the Cerial Lives - A Pantry Story

I will also try to bring some of my neighbors into the fold as they are also doing projects almost all the time.

Thanks for reading and I look forward to providing updates regularly with our previous, current and future projects.